因为做科研需要大量计算Centiloid指标,遂尝试编写一款简单的portable小程序,研究发现技术栈用cpp比较合适,研究过程记录如下。
关键步骤重点参考了CMU的课程Methods in (Bio)Medical Image Analysis
编译SimpleITK
编译SITK可以参考下面两篇文章
下面开始进行SimpleITK的安装
git clone https://github.com/SimpleITK/SimpleITK.git到本地
- 根目录名称不能太长,Windows下对路径有最大长度限制(~260),而SITK里面嵌套的目录很长
- C++的包管理似乎都是在本地的,不像python有
pip那么方便
- 进行
out-of-tree-build
- 简单说,
in-tree-build就是先写代码,然后吧代码跟sitk一起编译,这种方法可以修改sitk原始代码,但是容器引起混乱
out-of-tree-build是先把代码编译成二进制,然后再使用sitk源码路径./SimpleITK- 目标编译路径
./SITKBin
- 启动CMake,设置SOURCE directory为
./SimpleITK/SuperBuild
- 选择BINARY directory
./SITKBin
-
Tips: 不小心弄错了可以在CMake里选File/Delete Cache
- 按下Configure按钮,选择合适的编译器(我的是Visual Studio 2019)开始Configure
- 将SITK的CMake选项配置成下图所示的状态:
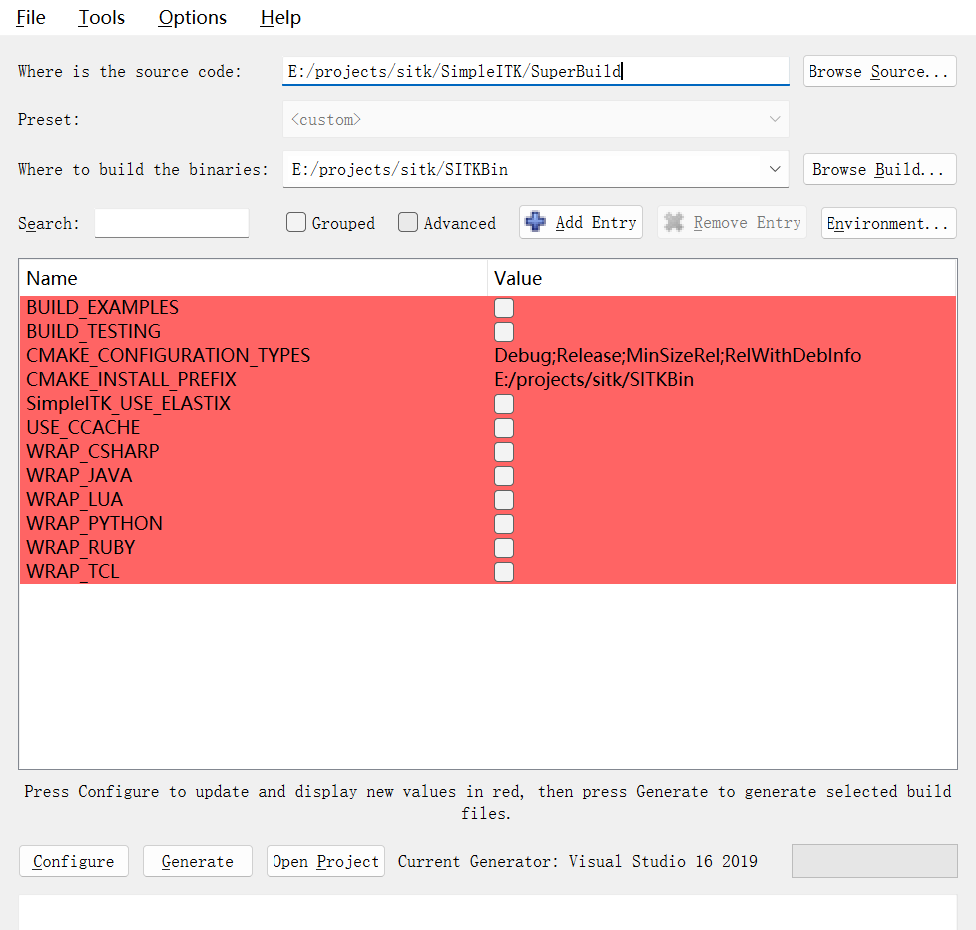
- 依次点击
Configure(如果有红的选项就需要点)、Generate、Open Project
- 在Visual Studio中选
生成/生成ALL_BUILD
- ALL_BUILD是专属CMake的生成选项,生成解决方案会按照 Visual Studio 解决方案的配置来构建所有项目,而生成ALL_BUILD是根据 CMake 生成的构建目标进行构建。
- 测试ITK编译是否成功
- 把
.\SITKBin\ITK\Examples\Installation下的文件拷贝出来,作为源码
- 创建一个新的编译路径,如
.\HelloWorldBin
- 用CMake重复上面的动作,不过可能需要手动指定
ITK_DIR=path\to\SITKBin\ITK-build
- 最后在VS中生成HelloWorld即可
编写自己的SITK C++项目
- 使用Visual Studio新建一个CMake项目
- 首先需要配置一下
CMakeLists.txt文件
1
2
3
4
5
6
7
8
9
10
| cmake_minimum_required (VERSION 3.8)
find_package(ITK REQUIRED)
include(${ITK_USE_FILE})
find_package(SimpleITK REQUIRED)
include(${SimpleITK_USE_FILE})
add_executable (CentiloidCalculator "CentiloidCalculator.cpp" "CentiloidCalculator.h")
target_link_libraries(CentiloidCalculator ${ITK_LIBRARIES} ${SimpleITK_LIBRARIES})
|
如果这时候找不到ITK或SimpleITK的话,需要在项目/CentiloidCalculator的CMake设置里手动添加CMake变量和缓存。
有一个坑爹的地方:
1
2
3
| from monai.transforms import GaussianSmoothd
GaussianSmoothd(keys=["image"], sigma=1),
|
这里的sigma=1感觉好像不太对。在itk里相似结果需要设置sigma=4:
1
2
3
4
5
6
7
8
9
10
11
12
13
14
15
| using ImageType = itk::Image<float, 3>;
ImageType::Pointer GaussianSmooth(ImageType::Pointer image, double sigma) {
using SmoothingFilterType =
itk::SmoothingRecursiveGaussianImageFilter<ImageType, ImageType>;
SmoothingFilterType::Pointer smoothingFilter = SmoothingFilterType::New();
smoothingFilter->SetInput(image);
smoothingFilter->SetSigma(sigma);
smoothingFilter->Update();
return smoothingFilter->GetOutput();
}
image = GaussianSmooth(inputImage, 4);
|
但是经过仔细调查,发现还是不对劲,正确的做法是这样的!
1
2
3
4
5
6
7
8
9
10
11
12
13
14
15
| ImageType::Pointer GaussianSmooth(ImageType::Pointer image, double sigma) {
using SmoothingFilterType =
itk::DiscreteGaussianImageFilter<ImageType, ImageType>;
using BoundaryConditionType = itk::ConstantBoundaryCondition<ImageType>;
SmoothingFilterType::Pointer smoothingFilter = SmoothingFilterType::New();
BoundaryConditionType boundaryCondition;
boundaryCondition.SetConstant(-0.1);
smoothingFilter->SetInputBoundaryCondition(&boundaryCondition);
smoothingFilter->SetMaximumKernelWidth(9);
smoothingFilter->SetInput(image);
smoothingFilter->SetUseImageSpacingOff();
smoothingFilter->SetVariance(sigma * sigma);
smoothingFilter->Update();
return smoothingFilter->GetOutput();
}
|
也就是说,不应该用SmoothingRecursiveGaussianImageFilter这个类,因为它默认使用的单位是物理空间单位,而不是体素单位!需要使用的是DiscreteGaussianImageFilter。
如何使用ONNXRuntime在C++中使用Pytorch模型
1
2
3
4
5
6
7
8
9
10
11
12
|
Ort::SessionOptions sessionOptions;
sessionOptions.SetIntraOpNumThreads(1);
std::wstring w_modelPath = std::wstring(modelPath.begin(), modelPath.end());
try {
this->session = new Ort::Session(env, w_modelPath.c_str(), sessionOptions);
} catch (const Ort::Exception &e) {
std::cerr << "Error loading model:" << e.what() << std::endl;
throw std::runtime_error("Failed to load model.");
}
|
记录一个Pytorch到itk的坑点
由于需要把图像展平成一维向量送给onnxruntime,因此需要提取itk图像的像素信息
最开始我是这样做的
1
2
3
4
5
6
7
| std::vector<float>imageData;
imageData.reserve(image->GetLargestPossibleRegion().GetNumberOfPixels());
itk::ImageRegionIterator<ImageType> imageIterator(
image, image->GetLargestPossibleRegion());
for (imageIterator.GoToBegin(); !imageIterator.IsAtEnd(); ++imageIterator) {
imageData.push_back(imageIterator.Get());
}
|
但是这样是不行的,因为体素在内存中的排列顺序不对,正确的方法应该是这样:
1
2
3
4
5
6
7
8
9
10
11
12
13
14
15
16
17
18
19
| void ExtractImageData(ImageType::Pointer image, std::vector<float>& imageData) {
ImageType::RegionType region = image->GetLargestPossibleRegion();
ImageType::SizeType size = region.GetSize();
imageData.resize(size[0] * size[1] * size[2]);
for (size_t z = 0; z < size[0]; ++z) {
for (size_t y = 0; y < size[1]; ++y) {
for (size_t x = 0; x < size[2]; ++x) {
ImageType::IndexType index = { {x, y, z} };
float pixelValue = image->GetPixel(index);
imageData[x * size[0] * size[1] + y * size[0] + z] = pixelValue;
}
}
}
}
std::vector<float>imageData;
imageData.reserve(image->GetLargestPossibleRegion().GetNumberOfPixels());
ExtractImageData(image, imageData);
|
最外层的z实际上才是变化最快的那一个!
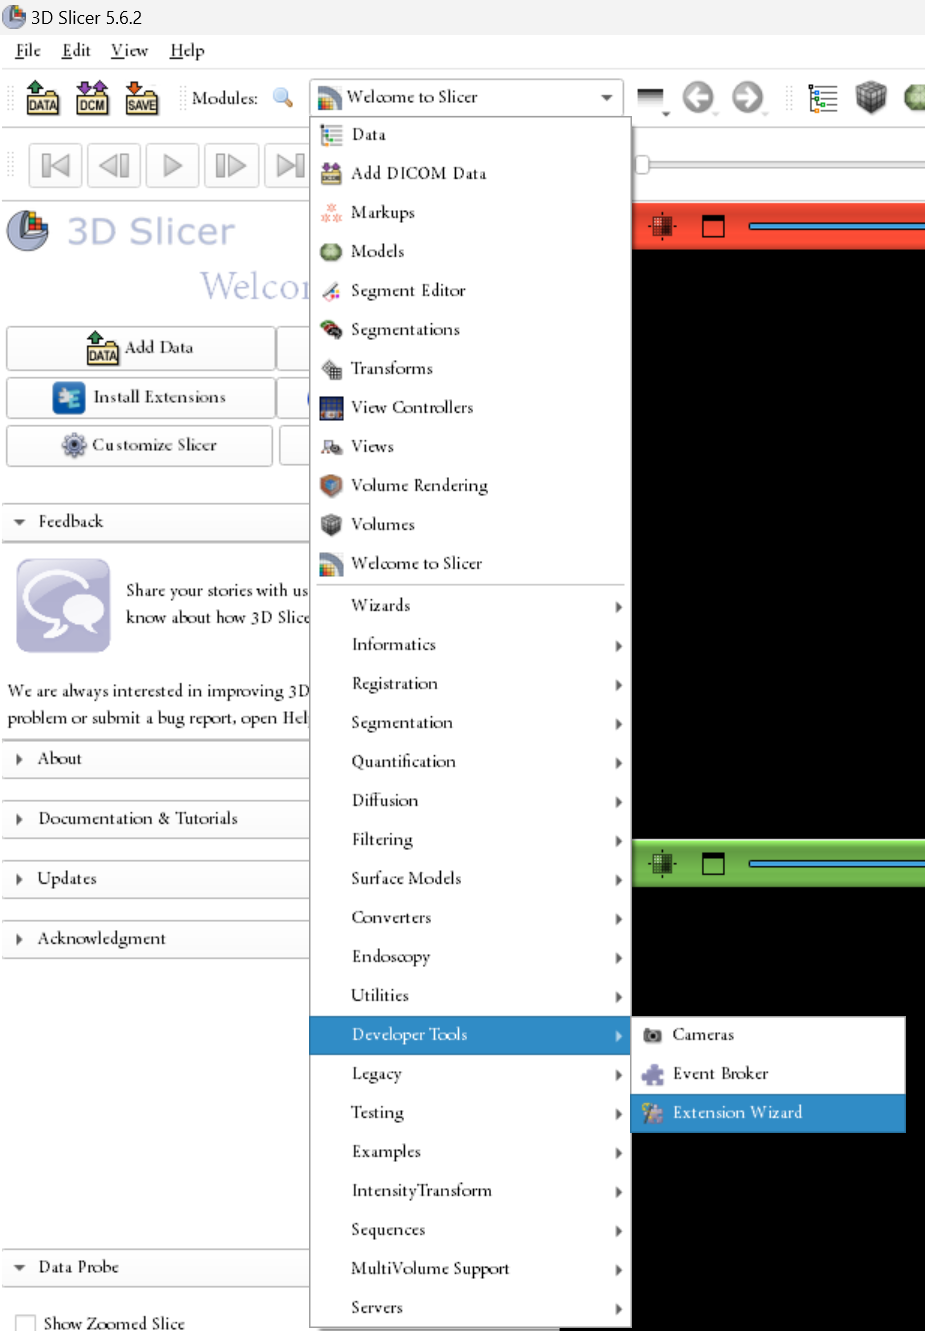
Slicer Extension
如何安装一个其他开发者开发的插件?Developer Tools - Extension Wizard - Select Extension,然后找到插件目录安装就可以了
检测cpp项目依赖情况
开始页面打开Developer Command Prompt
1
| dumpbin /dependents cpp-program.exe
|
记录一下cpp中使用itk的坑点
我编译了CentiloidCalculator之后,发现换个电脑执行不了,在PythonSlicer的环境里也会发生内存错误!经过痛苦的debug之后发现是下面的问题:
- 编译的程序需要一些动态链接库,比如通过
dumpbin分析动态链接库的依赖,有MSVCP140.dll(后面带D的表示Debug),在没有MSVC dll库的环境里是不能运行的!因此需要把dll文件拷贝到exe文件同目录下
- 单纯使用VS的创建CMAKE项目是不太好用的!写完代码之后,记得用CMAKE_GUI重新Configure + Generate一下,然后再用VS打开项目!这个时候编译才符合一般CMAKE项目的编译方式
- sitk的ALL_BUILD记得选Release模式(当然也可以选别的),否则CentiloidCalculator就只能用Debug策略编译(这个很好理解,上游项目是Debug模式编译的)
下面的是批处理脚本,用于把各个关键的运行时库(和一些其他组件)打包在一起。
1
2
3
4
5
6
7
8
9
10
11
12
13
14
15
16
17
18
19
20
21
22
23
24
25
26
27
28
29
30
31
32
33
34
35
36
37
38
39
| @echo off
mkdir CentiloidCalculator_green
copy .\Release\CentiloidCalculator.exe CentiloidCalculator_green\
copy E:\projects\sitk\SITKExample\onnxruntime-win-x64-1.18.0\lib\onnxruntime.dll CentiloidCalculator_green\
copy C:\Windows\System32\MSVCP140.dll CentiloidCalculator_green\
copy C:\Windows\System32\VCRUNTIME140.dll CentiloidCalculator_green\
copy C:\Windows\System32\VCRUNTIME140_1.dll CentiloidCalculator_green\
copy C:\Windows\System32\api-ms-win-crt-runtime-l1-1-0.dll CentiloidCalculator_green\
copy C:\Windows\System32\api-ms-win-crt-math-l1-1-0.dll CentiloidCalculator_green\
copy C:\Windows\System32\api-ms-win-crt-heap-l1-1-0.dll CentiloidCalculator_green\
copy C:\Windows\System32\api-ms-win-crt-stdio-l1-1-0.dll CentiloidCalculator_green\
copy C:\Windows\System32\api-ms-win-crt-filesystem-l1-1-0.dll CentiloidCalculator_green\
copy C:\Windows\System32\api-ms-win-crt-string-l1-1-0.dll CentiloidCalculator_green\
copy C:\Windows\System32\api-ms-win-crt-environment-l1-1-0.dll CentiloidCalculator_green\
copy C:\Windows\System32\api-ms-win-crt-convert-l1-1-0.dll CentiloidCalculator_green\
copy C:\Windows\System32\api-ms-win-crt-time-l1-1-0.dll CentiloidCalculator_green\
copy C:\Windows\System32\api-ms-win-crt-locale-l1-1-0.dll CentiloidCalculator_green\
copy C:\Windows\System32\api-ms-win-crt-utility-l1-1-0.dll CentiloidCalculator_green\
copy ..\x64-Debug\CentiloidCalculator\2head-pib-noise-gelu-64channel.onnx CentiloidCalculator_green\
copy ..\x64-Debug\CentiloidCalculator\rigid.onnx CentiloidCalculator_green\
copy ..\x64-Debug\CentiloidCalculator\affine_voxelmorph.onnx CentiloidCalculator_green\
copy ..\x64-Debug\CentiloidCalculator\voi_WhlCbl_2mm.nii CentiloidCalculator_green\
copy ..\x64-Debug\CentiloidCalculator\voi_ctx_2mm.nii CentiloidCalculator_green\
copy ..\x64-Debug\CentiloidCalculator\paddedTemplate.nii CentiloidCalculator_green\
echo 绿色软件包已经创建在 CentiloidCalculator_green 目录中
pause
|
记录一个debug vs release的神奇坑点
起因:我发现我的cpp代码写得有些问题,随进行一些修改。主要有两个部分的错误
- FOV placement的代码有点问题,需要重写
- Elastic warp之后的图像没有保存,用的是FOV placement之后重采样的结果。这个错误有点低级,好在发现了
这里稍微多说两句关于问题1的错误。ITK对图像的origin/direction/spacing的定义是这样的

用公式写就是
p=A(s⊙v)+d
其中p是物理空间坐标,A是direction矩阵,s是spacing,v是体素空间坐标,d是origin(也就是位移)。你可以理解成先定位某个点v在物理空间中的坐标,然后再加上一个偏移量d。
我们从神经网络能拿到两个Voxel space方位角,一个Voxel space 的Anterior Commissure坐标。神经网络的输入是64 x 64 x 64的。现在要根据这些信息,去校正原图的FOV。主要思路就是借助物理坐标。思路如下:
- 计算物理空间下两个方位角的向量(ex,ey),根据叉乘得出ez,以及物理空间下AC的位置
- 我们希望通过旋转矩阵R旋转图像,从而让ex跟物理空间的x轴平行,yz轴同理
- 我们的这个旋转矩阵其实就是[ex ey ez]−1,因为[ex ey ez]其实构成了把I旋转到[ex ey ez]的旋转矩阵,现在我们取个逆矩阵把它转回来就行了。当然更进一步,正交单位矩阵的逆矩阵就是转置,也可以写成R=[ex ey ez]T
- 那我们的新direction矩阵就可以写成A′=RA
- 于是我们得到公式:p(AC)=A′[s⊙v(AC)]+d′=0,解释一下就是,AC这个点在新映射关系下会映射到物理空间的原点,现在A′,v(AC),s都是已知的,把d′解出来就行了
1
2
3
|
newImage -> SetOrigin(newOrigin);
newImage -> SetDirection(newDirection);
|
画个图总结一下,过程大概是这样的:
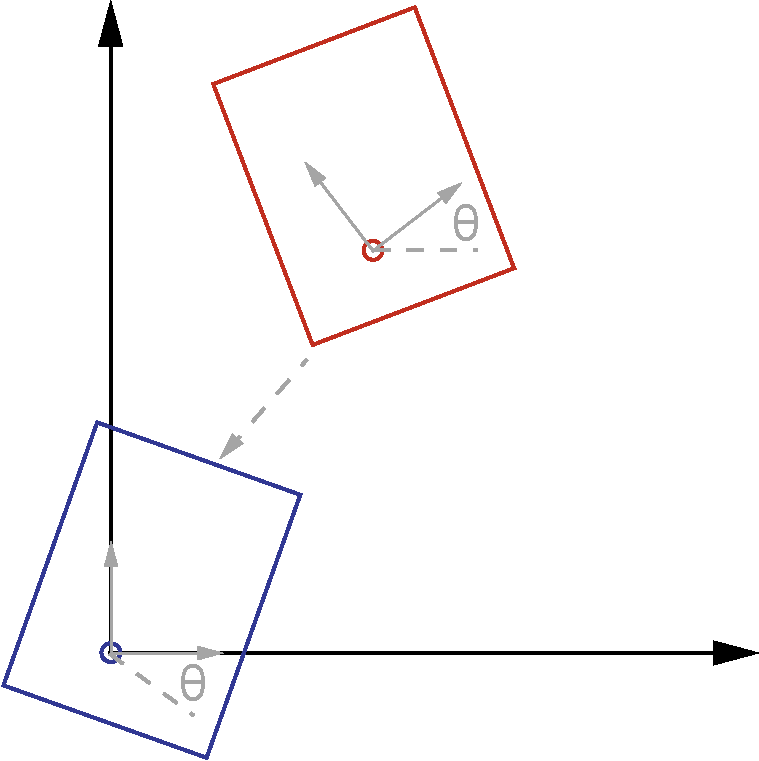
我们实际上要做的事情就是
- 把direction旋转θ角
- 然后把图像AC平移到原点
大坑
下面来说发生的诡异bug:某天我在研究怎么修bug的时候电脑卡了,然后我重启,重启之后我发现release模式编译的CentiloidCalculator会在创建reader指针的时候闪退!
1
2
| using ReaderType = itk::ImageFileReader<ImageType>;
ReaderType::Pointer reader = ReaderType::New();
|
下面是我的一些尝试:
- 尝试重新编译ITK/SimpleITK,无效!
- 尝试使用debug模式编译,结果是好的,正常运行
- 尝试使用RelWithDeInfo编译,和release模式一样,但是可以定位到问题了
1
| 0x00007FF904AF8C34 (msvcp140.dll)处(位于 Calculator.exe 中)引发的异常: 0xC0000005: 读取位置 0x0000000000000000 时发生访问冲突。
|
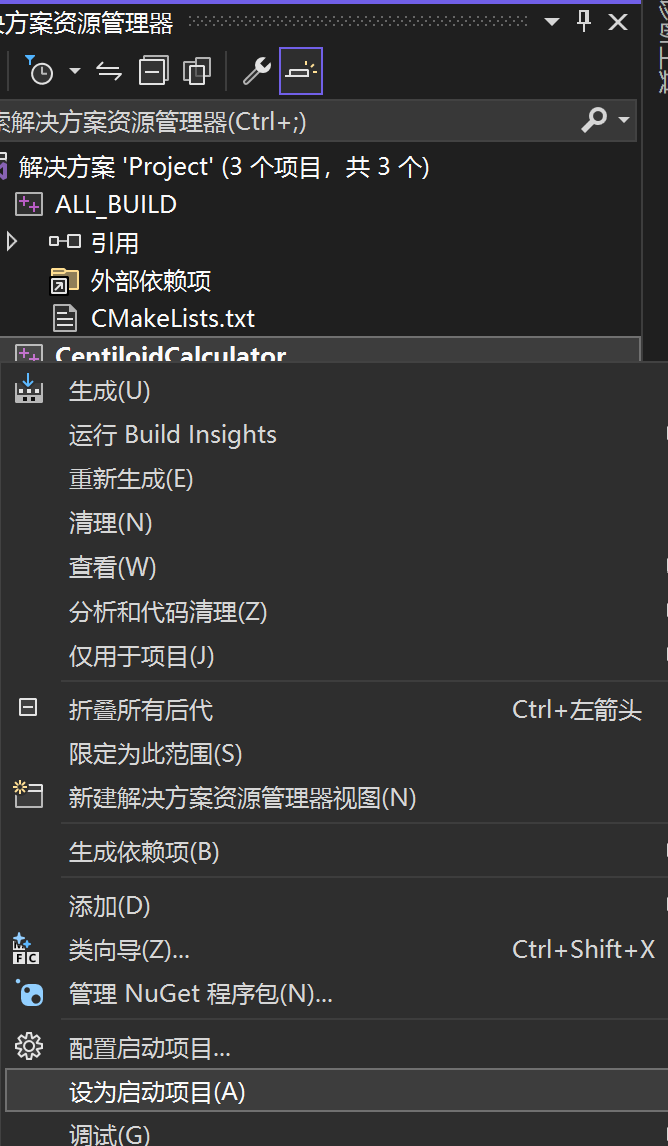
顺带一提,使用VS来调试CMAKE项目需要先设置启动项
这时候我网上看到了这样一个帖子,我开始怀疑有没有可能是debug模式和release模式的静态库混用了,往这个方向在想。
最后发现问题其实并不在这里,应该是VS的动态链接库出了问题。在VC Redistributable重装之后完美解决!
我猜测这个问题有可能跟windows更新破坏了某些组件有关。这也太坑了orz
Windows下app-local打包问题
微软官方确认 UCRT 支持 app-local
- UCRT(api-ms-win-crt-*.dll / ucrtbase.dll)
- C:/Program Files (x86)/Windows Kits/10/Redist/10.0.22621.0/ucrt/DLLs/x64
- VC++ 运行库(vcruntime/msvcp/concrt 等)
- E:/programs/Microsoft Visual Studio/2022/Community/VC/Redist/MSVC/14.44.35112/x64/Microsoft.VC143.CRT